Custom Maps / Workshop
Valve has introduced workshop map functionality, enabling the hosting of custom maps on CS2 servers without any additional requirements. In this guide, we'll show you how to configure your server to host workshop maps.
Table of Contents
Important Information
The conventional method of hosting custom maps, involving FastDL and manually transferring maps to the server directory, is no longer supported. Valve has decided to exclusively support workshop maps, eliminating the need to download and upload maps to the server - everything is now managed through Steam Workshop.
Hosting a Single Workshop Map
Step 1: Find a Map
Go to CS2 Workshop and find the map you want to host on your server. Click on the page of your chosen workshop map.
Step 2: Copy Workshop ID
In the URL of the selected workshop map, copy the last digits - this is the Workshop ID.
Example: In the URL https://steamcommunity.com/sharedfiles/filedetails/?id=3070212801, the Workshop ID is 3070212801
Step 3: Server Configuration
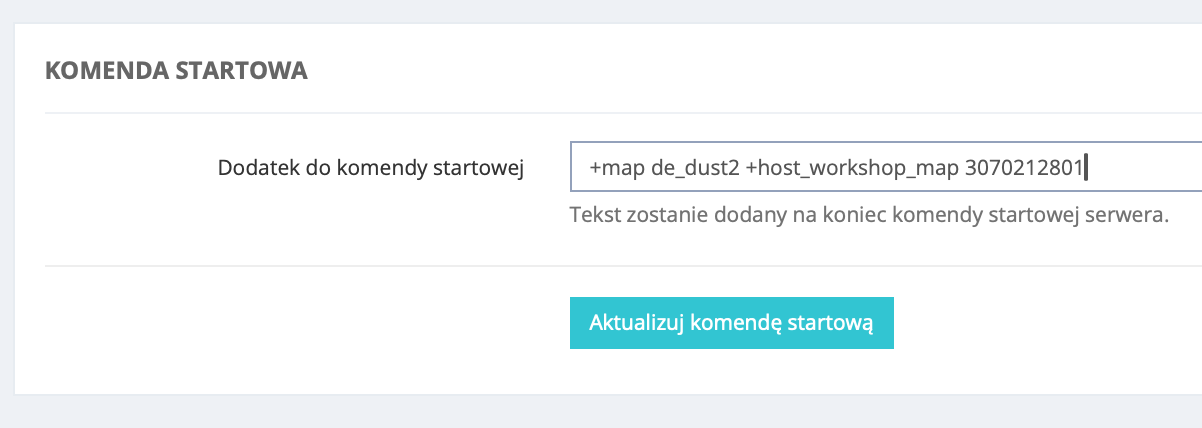
In the ServerProject management panel, go to the tab Settings -> START COMMAND and add:
+host_workshop_map 3070212801
Step 4: Save and Restart
Save the configuration and restart the server.
Step 5: Done!
After connecting to the server, players will have the option to accept or decline the Workshop map installation.
Creating and Hosting a Workshop Collection
Step 1: Subscribe to Maps
Go to CS2 Workshop and find the maps you want to add - typically searching for surf, kz_ or other maps that interest you. Subscribe to the maps you want to add.
⚠️ WARNING: Make sure to test the map before adding it to the collection. If a map is incompatible or broken, the entire collection will stop working.
Step 2: Create Collection
Create a CS2 collection by clicking: Browse → Collection → Create Collection on the right side or click this link.
Step 3: Enter Details
Enter the required information and click Save and Continue.
Step 4: Add Maps
- Click on the Subscribed Items tab
- Add the maps you want by clicking the plus icon
- When finished, click Save and Continue
Step 5: Publish Collection
Click the Publish button at the top of the page.
Step 6: Copy Collection ID
Get your collection ID. If you look at the URL bar on the collection page, the last series of digits is the collection ID. Copy this number.
Example: In the URL https://steamcommunity.com/sharedfiles/filedetails/?id=3084972720, the Collection ID is 3084972720
Step 7: Configure Server
In the ServerProject management panel, go to your CS2 server settings and add to the start command:
+host_workshop_collection 3084972720
⚠️ WARNING: Setting a starting map for Workshop collections is not currently supported by Valve.
Step 8: Save and Restart
Click Save & Reboot to apply the changes.
Workshop Commands
Listing and switching between maps works differently than in CS:GO. In CS2, the following Workshop-related commands are available:
ds_workshop_changelevel
Changes the workshop map by name.
Example usage:
ds_workshop_changelevel de_dust2_workshop
ds_workshop_listmaps
Displays a list of all workshop maps available on the server.
Example usage:
ds_workshop_listmaps
sv_workshop_allow_other_maps
When using a workshop collection, users can play on other maps on the server when it's empty and add them to the collection's map rotation.
Example usage:
sv_workshop_allow_other_maps 1
Troubleshooting
Map Won't Load
- Check if the Workshop ID is correct
- Make sure the map is public and available in the Workshop
- Restart the server after changing the configuration
Collection Not Working
- Check if all maps in the collection are compatible with CS2
- Remove broken maps from the collection
- Make sure the collection is published as public
Players Can't Join the Server
- Make sure players have accepted the Workshop map download
- Check if the map isn't too large (this may extend loading time)